Discount Easter Chocolate Pancake Recipe
Most people can’t say that they dislike chocolate chip pancakes. Most people also love Easter candy, so when we saw some discount Easter chocolate at the grocery store the other day, it only made sense to buy some and whip up a discount Easter candy pancake recipe for breakfast. Pancakes, in general, are a great way to load up on the carbs and are a great cheat meal if you get creative with throwing on the toppings (or super cheap Easter candy with plenty of shelf life left!).
Subscribe to our food YouTube channel!!Be careful if you have a cat, though.
Those must be tuna flavored pancakes. Gross.
You can pretty much use any discount Easter candy you can find (chocolate makes the most sense).
As long as you make sure there’s a lot and it’s tasty, those are the main requirements. This recipe uses two different kinds of candy – Hershey’s Kisses and Reese’s Peanut Butter Eggs. We really only needed the bag of the kisses, but seeing Reese’s eggs for 24 cents a piece, I mean we couldn’t ignore those things right?
Cookware and Ingredients Needed
| What It is | Name | Where To Find |
| Cookware | Mixing Spatula | Amazon |
| Cookware | Turner Spatula | Amazon |
| Cookware | 2 Mixing Bowls | Amazon |
| Cookware | Cutting Board | Amazon |
| Cookware | Electric Griddle (or stovetop) | Amazon |
| Cookware | Cutting Knife | Amazon |
| Cookware | 1/4 Cup and 1 Cup Measuring Cups | Amazon |
| Cookware | 1 tablespoon measuring spoon | Amazon |
| Cookware | Measuring Cup for Liquids | Amazon |
| Ingredient | Discount Easter Chocolate | Most Stores |
| Ingredient | Skim Milk (need 1 1/3 Cups) | Grocery Store |
| Ingredient | Olive Oil (optional, more on this later) | Store |
| Ingredient | Pancake Mix (2 cups) | Store |
| Ingredient | 2 eggs | Store, local chicken |
Yield: 10-12 discount Easter chocolate pancakes
To get started, I’ll be doing the fun part first: ripping into the Easter candy. If you find the same things we’ll be using, you can follow along.

The first order of business is the bag of Hershey Kisses.

As you can see by the bunny ears beyond the glare, these aren’t just Hershey Kisses. Even though they definitely were with Easter-themed outer packaging and multi-colored wrapping on the kisses themselves.

The pile of them will be big.

Grab the cutting board and find a knife.

Cut the Hershey Kisses into thirds (or smaller pieces if that makes more sense).

That’s one, many more to go.

If you get to the point where I did where my wrist was sore, it’s not the end of the world if you want to stop the cutting and just start unwrapping the kisses individually and throwing them into the pile.

While it might seem like having the full-size discount easter chocolate in the pancake mix could cause issues, they actually ended up turning out pretty well. I also ended up only using about half the bag of Hershey Kisses, I can’t imagine what would have happened if the whole thing went in there.

Grab one of your mixing bowls.

Pour the discount Easter chocolate that you just cut up into the bowl.

Now it’s time to cut up the Reese’s Peanut Butter Eggs. You actually do need to cut these up, they’re just too big to cook an entire one into a pancake.

Unwrap the first Reese’s Egg and set it on the cutting board.

For this first one, I just cut it across once.

Pour the first one into your chocolate mix.

Don’t forget about the second discount Easter chocolate egg!

I cut this one across once but then decided to chop it up a little more.

Cutting it one more time down the middle did the trick.

Pour the chopped up second egg into the mix.

By now, you should start to notice a fair amount of chocolate accumulating in the bowl.

Next, pre-heat your griddle to 375 Degree F.

If you’re using one of these Bella’s, you’ll need to eyeball whether the heat’s really at 375 or not because it jumps between 350 and 400 pretty quickly.

If you have two separate mixing bowls, you can skip this step.
Initially, my plan was to throw everything into the bowl, including the mix, eggs, milk, and olive oil. After thinking about it for a minute, it made more sense to leave the chocolate out until last because it would make mixing the entire thing into a smooth consistency difficult. In the picture you’re seeing, I’m dumping the chocolate out of the main mixing bowl and into a cereal bowl because I didn’t really want to go hunting for another one in the cabinets.

Next, grab your pancake mix.
The one I used was Log Cabin, although there are also a variety of others out there.

Pour your first cup of pancake mix into the 1 cup measuring cup.


Pour the second cup of pancake mix.

Dump the second cup of pancake mix into the bowl.

Time for that talk about the olive oil.
There’s a little catch here if you plan on using olive oil. If you also use an electric griddle and it’s a non-stick, YOU SHOULD NOT USE OIL or non-stick spray or anything because that will damage the non-stick surface. The tough part is that using olive oil will give the pancakes a fluffier texture, so you have a choice to make: slightly less fluffy pancakes and no damage to your non-stick surface (by dropping the olive oil), slightly fluffier pancakes and damage to your non-stick surface if you go ahead and use the oil, or grabbing a cast iron skillet/non-stick griddle to make these instead.
We took the lazy/probably non-stick damaging way here.
It won’t happen in this kitchen again, but it happened. To make matters worse, we might have also used some non-stick spray. Yikes.

If your cooking surface can handle oil, proceed with the next step of getting a 1 tbsp measuring spoon.

Go ahead and pour the first tablespoon of olive oil into the mix.

Pour in the second tablespoon of olive oil.

Now grab your first egg and crack that into the mix.

Then, crack the second egg into the mix.

Now, go and grab the skim milk if it’s in the fridge.

You will be measuring 1 1/3 Cups of milk here

You can always do a little more or a little less milk.

Pour the milk in with the rest of the pancake mix and grab a spatula or spoon to mix it around. Mix until it becomes smooth, it should take about 30 seconds.

Your mix should look like the above picture.

Grab your other bowl of the discount Easter chocolate, it is time.

Dump the chocolate into the mixing bowl and start to stir it around.

Here’s that non-stick spray we used that we really weren’t supposed to. Oh, well.

Don’t mind me, just casually spraying non-stick spray where I’m not supposed to. DON’T DO THIS!!!

Grab your 1/4 cup measuring scoop.
The time has arrived to put this mix to the test. Scoop your first glob of pancake mix up and plop it on to the hot griddle.

These will cook for about 45 seconds on each side.

Have the turner spatula on-hand for this part.
When you notice bubbles starting to pop out the top of the pancake, that will signal that it’s time to flip it over. Again, about 45 seconds and then once you flip it, cook the other side for another 45 seconds.

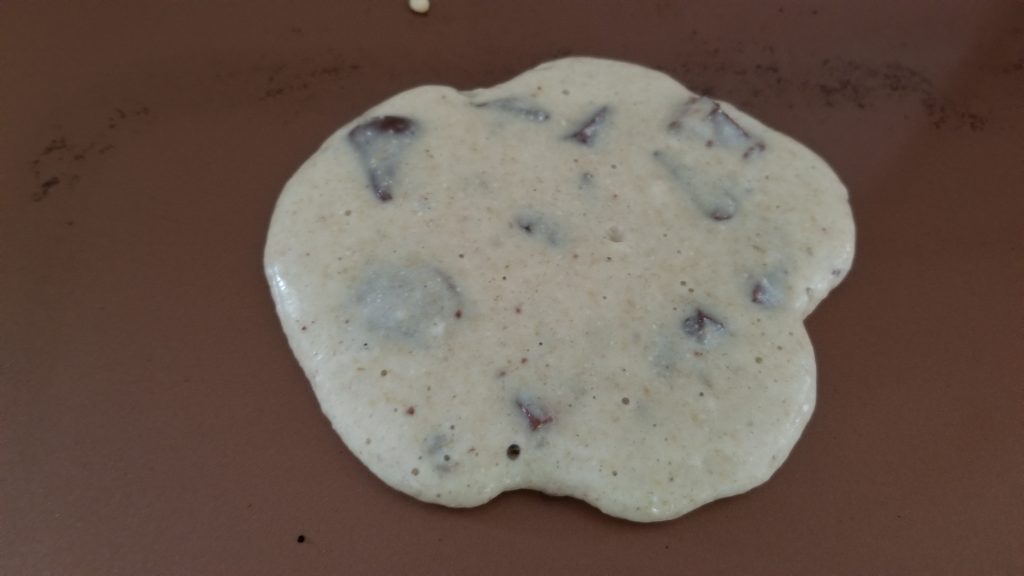
We left this first one on for a little too long, however, it also had so much discount easter chocolate in it that it was hard to tell if the pancake was burnt or if there was just a splotch of chocolate on it.

This was after flipping the first one, I’m going with slightly burnt. It actually tasted fine like that.

The second side came out nice and browned and the black parts there are definitely just chocolate. Yours should look something like this.

A view of the pancake in profile to show some of the chocolate content.

It may also help to set the stove or microwave timer to 10-ish minutes and use that to time the pancakes (alongside the bubbles).
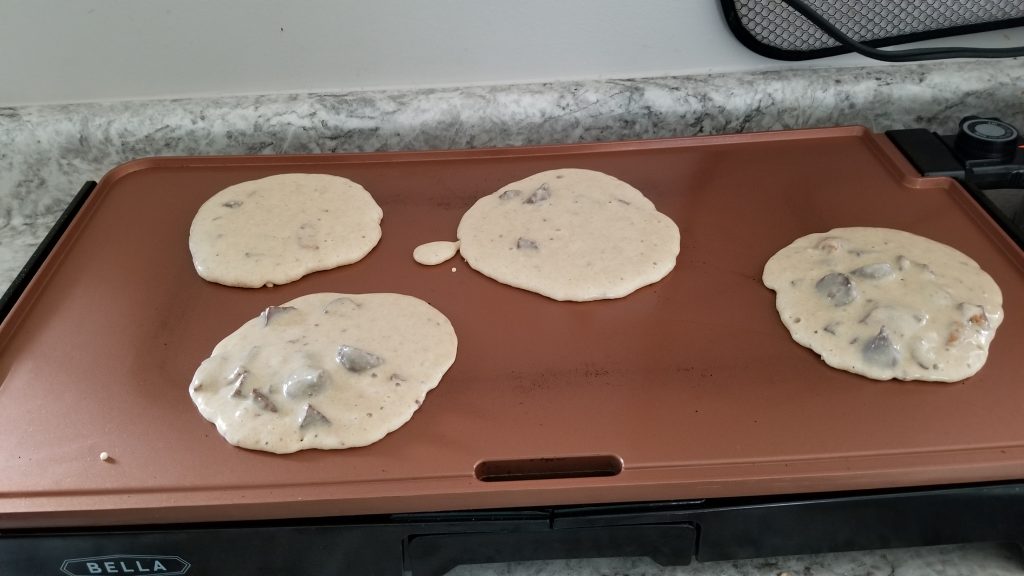
Once you feel comfortable, drop a few pancakes on the griddle at once.

Once all of the pancakes are done, scrape up any excess batter and cook that, too.

Your finished product should look somewhere in the ballpark of this stack of discount easter chocolate pancakes. We were able to squeeze one or two more than twelve out of the recipe. My thought is that because of how big the chocolate chunks were, that caused less batter per pancake and spread it out more.

Don’t forget to clean everything up and share some around the house if you have roommates!
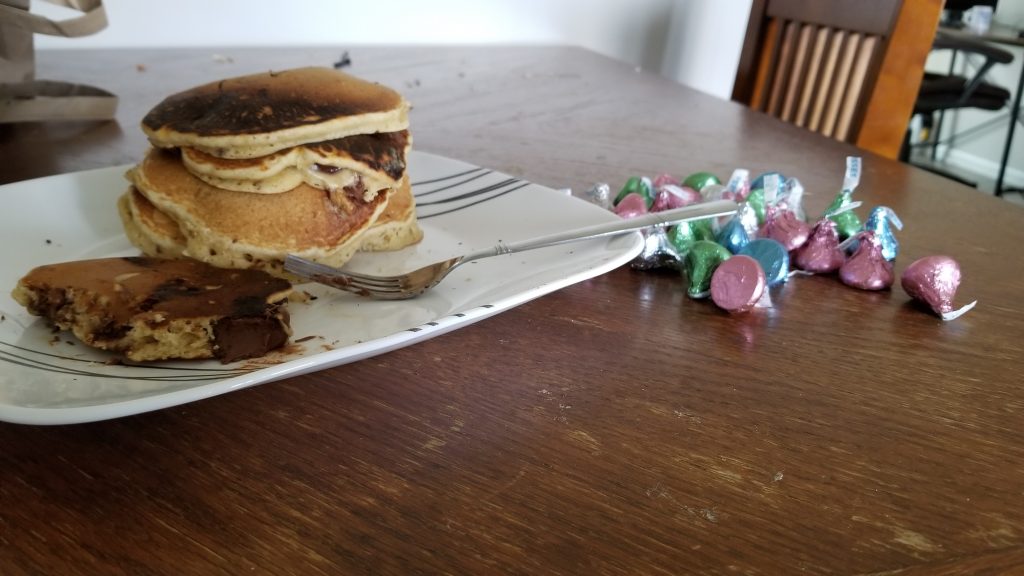
Remember to go for a jog tomorrow and work these off, too. I couldn’t look at another Kiss after eating 10 of these.
If you like this recipe, be sure to tell other people about it by sharing on your favorite social media platform!